webos raspberry pi 4 image download
여러분 대부분은 webOS 이미지를 구하거나, 빌드를 시도하다가 왔을 겁니다.
i'm sure you came here while LF pre-built img or got failure on building img for rpi3, rpi4.
http://build.webos-ports.org/webosose/
404... you have to build your own img for rpi4.
and if you get
ERROR: Task (/home/user/build-webos/meta-qt6/recipes-qt/qt6/qtbase_git.bb:do_install_ptest_base) failed with exit code '1'
간단히 요약하면 가상머신 쓰지 말고,
리눅스용 윈도우 하위 시스템 쓰지마세요.
그냥 500기가정도 파티션 잡아서 듀얼부팅을 하던 해주세요..
아 근데 노트북 일부 기종은 윈도우만 부팅되게 되어있어서 안되더라구요.
글구 듀얼부팅 한다 쳐도... 안됩니다... 왜 인지는 모르겠어요.
데탑 쓰세요... 진짜 미칩니다. 그냥 데탑이 짱입니다.
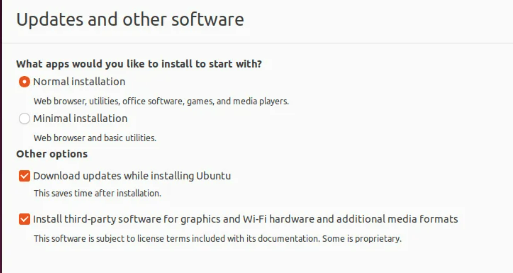
try on ubuntu desktop. 20.04.
do not try on virtual machine, wsl , wsl2
18.04, 20.04, 22.04 i tried all that version. and all failed.
i lost more than 100Hrs.
AND!
PLZ UPDATE BIOS LASTEST VERSION IF YOU ARE USING AMD's CPU!!!!
STUTTERING WILL BOTHER YOU!!!
//for koreans
https://mirror.kakao.com/ubuntu-releases/
// OTHERS
https://releases.ubuntu.com/20.04/
Rufus - The Official Website (Download, New Releases)
rufus.ie
bake install USB and set Partition at least 400GB. it takes more than 300GB while building ver . 2.19 devel now.
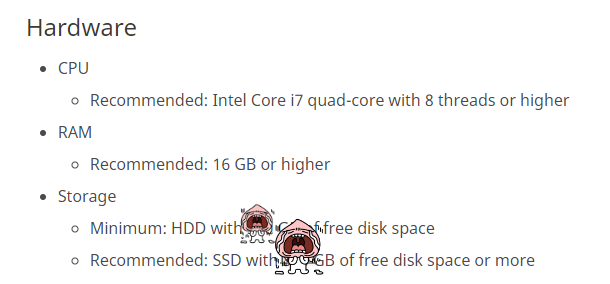
i recommend
at least 6 core CPU,
400GB + SSD partition, good condition internet network ,
at least 16GB RAM
16GB+ micro sd card.

then check something else,
$ sudo apt update

//i recommend set mirror link.

$ sudo apt-get update

$ sudo apt-get install python3-distutils

// my teammate said it needed, idk y. XD


$ git clone https://github.com/webosose/build-webos.git
$ cd build-webos
$ git fetch origin 2.19
$ git checkout 2.19


$ sudo scripts/prerequisites.sh


check your cpu cores.

$ cat /proc/cpuinfo | grep "physical id" | sort | uniq | wc -l

$ cat /proc/cpuinfo | grep "cpu cores" | uniq


then,     remember (num of cpu) * ( num of cores ) / 2

$ ./mcf -p <number of physical CPU cores / 2> -b <number of physical CPU cores / 2> <target-device-name>


// cf )

$ ./mcf -p 2 -b 2 raspberrypi4

$ ./mcf -p 2 -b 2 raspberrypi4-64


$ ./mcf -p 2 -b 2 raspberrypi3

$ ./mcf -p 2 -b 2 raspberrypi3-64

//for emulator

$ ./mcf -p 2 -b 2 qemux86

$ ./mcf -p 2 -b 2 qemux86-64


$ source oe-init-build-env

// turn off all other tasks  before next task


// for  device img

$ bitbake webos-image


// to clean,

$ rm -rf BUILD
$ ./mcf.status


//to build dev img

$ bitbake webos-image-devel


// to clean,

$ rm -rf BUILD

$ ./mcf.status
https://www.webosose.org/docs/guides/setup/building-webos-ose/

my build machine spec
- CPU : amd rizen 2600x
- RAM : 16GB ( 8GB X 2 ) DDR4 3000 MHz
- GPU : NVIDIA GTX 950 2GB
- Storage : Samsung M.2 1TB
- <num of CPUs> for mcf : 3
Device Type : rpi4-64,
Image Type : webos-image-devel
Time : about 15H ~ 16H

for rpi4, u need to unzip " ~.wic.bz2" to "~.wic" first.
then, flash webOS OSE.
https://www.webosose.org/docs/guides/setup/flashing-webos-ose/
Flashing webOS OSE
This page provides details for flashing the webOS Open Source Edition (OSE) image to a microSD card. In addition, this page describes how to verify the flashed image on the target device. Before You Begin Make sure you have completed the following: Build t
www.webosose.org
then, you have to connect display that has same or bigger than 1920*1080 resolution.
( becuz default resoltion setting is 1920*1080 and you might not able to set network setting with smaller one.)
https://www.webosose.org/docs/guides/setup/setting-up-network/
then use putty or mobexterm for ssh connection,
defalt name is "root" .
if you gonna use dual display,
root@raspberrypi4# config="[{\"device\":\"/dev/dri/card0\",\"hwcursor\":false,\"outputs\":[{\"name\":\"HDMI1\",\"geometry\":\"SIZE+0+0r0s1\",\"mode\":\"SIZE\"},{\"name\":\"HDMI2\",\"geometry\":\"SIZE+0+0r0s1\",\"mode\":\"SIZE\"}]}]"; luna-send -n 1 -f luna://com.webos.service.config/setConfigs "{\"configs\":{\"com.webos.surfacemanager.displayConfig\": $config}}"
root@raspberrypi4# config="[{\"device\":\"/dev/dri/card0\",\"hwcursor\":false,\"outputs\":[{\"name\":\"HDMI1\",\"geometry\":\"SIZE+0+0r0s1\",\"mode\":\"SIZE\"},{\"name\":\"HDMI2\",\"geometry\":\"SIZE+0+0r0s1\",\"mode\":\"SIZE\"}]}]"; luna-send -n 1 -f luna://com.webos.service.config/setConfigs "{\"configs\":{\"com.webos.surfacemanager.displayConfig\": $config}}"cf )
root@raspberrypi4# config="[{\"device\":\"/dev/dri/card0\",\"hwcursor\":false,\"outputs\":[{\"name\":\"HDMI1\",\"geometry\":\"1024x600+0+0r0s1\",\"mode\":\"1024x600\"},{\"name\":\"HDMI2\",\"geometry\":\"1024x600+0+0r0s1\",\"mode\":\"1024x600\"}]}]"; luna-send -n 1 -f luna://com.webos.service.config/setConfigs "{\"configs\":{\"com.webos.surfacemanager.displayConfig\": $config}}"
or just one,
root@raspberrypi4# config="[{\"device\":\"/dev/dri/card0\",\"hwcursor\":false,\"outputs\":[{\"name\":\"HDMI1\",\"geometry\":\"SIZE+0+0r0s1\",\"mode\":\"SIZE\"}]}]"; luna-send -n 1 -f luna://com.webos.service.config/setConfigs "{\"configs\":{\"com.webos.surfacemanager.displayConfig\": $config}}"
cf )
root@raspberrypi4# config="[{\"device\":\"/dev/dri/card0\",\"hwcursor\":false,\"outputs\":[{\"name\":\"HDMI1\",\"geometry\":\"1024x600+0+0r0s1\",\"mode\":\"1024x600\"}]}]"; luna-send -n 1 -f luna://com.webos.service.config/setConfigs "{\"configs\":{\"com.webos.surfacemanager.displayConfig\": $config}}"
then reboot your rpi4
reboot -f
editted date 2023-01-24
OR!
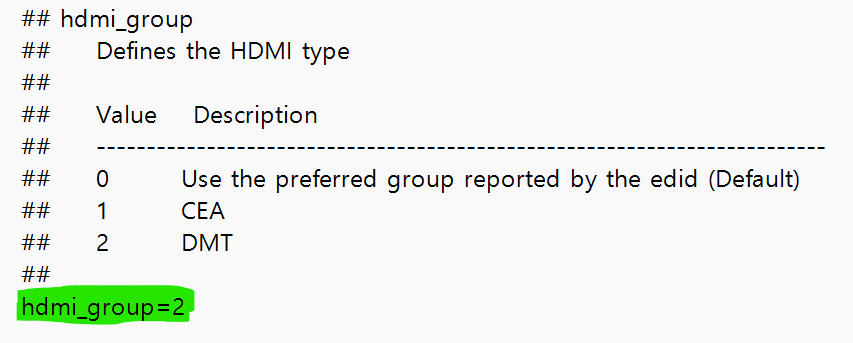
You can set display option by editting config.txt in your SD card /root folder.